Showing posts with label refashion. Show all posts

Tuesday, 21 August 2012

Get Tanked

I (embarrassingly) have had this shirt for about 10 years, and although its had a good innings as a bed shirt its really time to boot it out of my bedroom!

So what does one do with such a shirt? Refashion it into a tank for a little guy, of course!

Poor old Apex shirt has had its day...


 ...but has new life breathed into it!


I pretty much just traced an outline of an existing tank, added some ribbing to set off the text on the shirt, sewed it all up and bang! A brand new tank ready for summer.

He loves his new "soccer shirt". Not too sure where he thought that up given the big basketball on the front, but hey, he's given it a good wearing already.

I'm thinking a few more of these will be in order very soon...I can smell Spring just around the corner!

Saturday, 18 February 2012

The Abba Refashion Challenge!

Yes yes I've been missing in action again but life gets so busy sometimes my lil projects get put on the back burner. If only there were more hours in the day!

About 4 weeks ago a friend of mine cheekily asked for help with some fancy dress costumes by laying it out as a "challenge" - now how could I refuse when its dangled in front of me like that? The theme was rock/pop stars from the 60's-90's so the range was broad and MH & Co. decided to go with Abba so the whole family of four could get in on the fun!

The trick here was getting something up and running on a tight budget, so off to the op-shops she went! Loads of white satiny stuff was purchased at bargain basement prices and I couldn't really back out now.

Here's what we started with....

One ladies blouse...


Another satiny number....


And a lovely (hmm hmm) satin dressing gown 

...PLUS a small stack of typically psychedelic fabric that could have come straight from the 60's!
 
First things first we decided to go with dressing all four the same - MH is not a big dress fan so we went with shirts to be teamed with jeans and topped off with some kick-ass flares and accessories! 

The ladies shirt was chopped down to fit a girl of 4yrs - a simple take-in and alter the shoulders and sleeves to fit. 

The other satiny shirt (of which I'm not really sure belonged to man or woman but was being used to clothe the big guy of the foursome) was already a decent fit so the sleeves were simply chopped a little.

And that oh so sexy night gown thingy was used to make a shirt for my girl MH and a basic tee for the little guy. Off came the lace around the neckline, a few adjustments with length and we were good to go.

Did I mention how scared I was that this totally wouldn't work? I only ever sew for myself so if it all goes horribly wrong its no biggy...but this was nerve-wracking...these guys really needed these outfits! 

And the finished products? See for yourself...


Cuteness! Mini Abba-channeling.


 Mummy daughter team.
(Just quietly) I love how these flares turned out and the
matching sashes set them off perfectly


 Family affair!


Hmmm...perhaps a couple of decades early for a mullet but these guys definitely rocked it!

Wednesday, 11 January 2012

Maternity Shorts Refashion

Hellooo refashion! Man I love this stuff, I think its almost addictive.

Any of you ever been left frustrated while shopping for maternity clothes at the sheer lack of variety & "youthfulness" of what's out there? Much of what I've come across would leave a pregnant woman looking like an old maid! Thankfully in summer maxi dresses and stretchy tanks are a saviour, but there are slim pickings in the shorts department for a growing belly. ALL of the maternity shorts I have seen are knee (or just below knee) length, which is no good when you're 5ft nothing as they tend to hang somewhere around mid calf!

So, enter summery yellow thrifted shorts I picked up for 5 bucks. (The colour is washed out in the pics, so much brighter and yummier in real life!)

This was a total experiment but I will definitely be making more of these in the near future.

First step was to remove the waistband and zipper and end up with something like this...


Now, the fly in maternity pants is purely for decorative purposes and doesn't actually function, so once the zipper is removed a straight stitch right over the existing stitching will close it together.

Next its time to attach a fabulously stretchy band to the waist which will act as your new waistband. I raided my scrap stash and used an old white shirt, selecting white so that if I wore these with a white shirt the band colour wouldn't be visible underneath (but you could use any colour really). Using one of my maxi skirts as a guide, I cut a big fat strip of fabric that was tall enough to double over when being worn - you'll see what I mean in a minute - and wide enough to go right round the bump.


And ta da! I am amazed that these actually worked and they fit like a glove. These are one size bigger than I normally wear which is catering for a bit of extra bum & thigh I seem to have acquired this pregnancy. :(

So here's what I mean about the doubling over thing.....


I can wear the band folded down at the moment while the belly is still relatively petite, but as it gets out of control the band can be folded back up for more coverage!

I love these new shorts of mine. So summery and belly friendly all for 5 bucks and about an hour of my time.

Colour blocking anyone? 

Who says maternity wear has to be matronly!?

Saturday, 3 December 2011

Maternity Refashion

Its refashion time friends! I love these projects - partly because the hard work is already done for you in the form of an existing garment and partly because its so satisfying turning something reasonably hideous into a perfectly wearable piece!

So today I started with a thrifted dress I picked up for around $5 at the Salvos with the intention of giving it a little loving.

Now that the belly is starting to grow (its amazing how much earlier you 'pop out' second time around!) I am in need of some roomy clothes to accommodate it. Clothes preferably without the ridiculous pricetag that comes with store-bought maternity clothes.

Ok here's what I started with...

A bit potato-sackey! (ok, a lot)

So, I got to pinching in the dress by attaching a strip of elastic under the bust to give it a little shape and to separate the bust & belly areas. But it was still a bit lack lustre...

Elastic pinching! (with toddler running underfoot 
so mind the weird look here!)

So I raided my scrap pile and cut into an old white shirt to add some neckline detail. I simply cut strips from the shirt and played around with placement before sewing it in place.

And the finished product? I love it! And will actually wear it so we have a winner! 


Yay for refashions! And double yay for inexpensive maternity clothes!

Friday, 11 November 2011

Goodnight, cars.

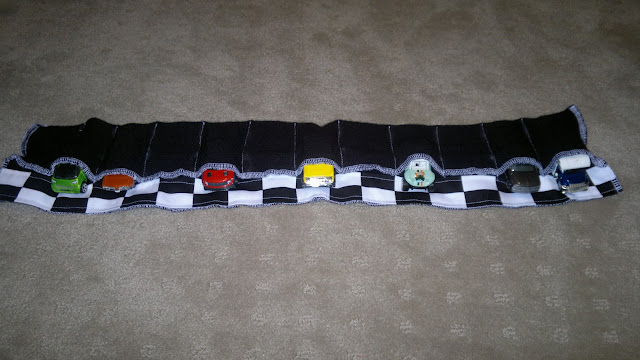
It seems these days we are increasingly finding stray matchbox cars under foot so today they were given a 'garage' in which they can go to sleep after a big day's play! We started with a pair of winter tights that I never wore - too thick and itchy to be comfortable.

Said uncomfortable tights!


This was so simple - I chopped off one leg right up where it meets the crotch, then cut down the length of the leg so it was one open piece.

The over locker went for a spin and finished all the edges, then I folded the leg piece back over so the ends didn't quite meet (you'll see in just sec). 

Add in a piece of checkered material on the bottom to give it that race car feeling, sew some straight lines to act as individual garages and that is it!

See how its not folded quite to the edge?


This is a novel way to get little ones to pack up their cars - our lil guy loves it and the stretch of the tights allows cars of all sizes to be squeezed inside. 


Who knew packing up could be so much fun? 

Now ssshhhh, the cars are sleeping. ;)

Monday, 5 September 2011

Dress Ups!

This weekend we took a drive up to little old Gulgong town to celebrate a friends birthday - Pimps & Ho's style! Now, I am partial to the odd fancy dress party and was pretty keen to put together these outfits. As much as I enjoy themed parties, I hate how pricey some of these outfits can be so off I went to the ops shops and put my bargain eyes on! First off a sparkly gold jacket caught my eye for the big pimp and was an absolute steal at $3!!! Next up I found this kids jacket for $4.50 and couldn't go past it. So, young Ollie was joining us on our trek and I got to pimping out this mini jacket.


I made a stencil by folding down the lapel and cutting out a piece in some zebra print fabric I had left over from a previous fancy dress. I then did the same thing for the flappy bits on the pockets and hand-tacked them on to the jacket. (Making them easy to remove if we ever want to use the jacket for real).


The finished product was ADORABLE, and I needn't have been worried that he wouldn't wear it - he LOVED it and has even asked if he can wear it again since. Cute. I'll enjoy this while he's still young enough not be bothered that 'mum made it'.

 Pimpin' attitude

Having success with the little pimp jacket, I tried my hand a little embellishing for the big pimp in my life. The above mentioned gold jacket was a little short in the arms (perhaps because I found it in the ladies section at Salvos - ssshhh... no one will ever know) so I got some more use out of that zebra print fabric and sewed on some cuffs. Perfecto! It was the perfect finish.

 Two perfectly fitted out pimps for $7.50!

So while this isn't strictly a sewing project, I did get out the needle and thread so that counts in my book. Thanks for reading!

Thursday, 25 August 2011

Refashioned Skirt

In celebration of these past few days of warmer weather (I can smell spring around the corner), I thought I'd share this refashion I did a little while ago. These culottes were a steal at $4 and I immediately had inspiration for a little refashioning. Well hey, if I failed what's 4 bucks?

So, here's the unflattering before shot....


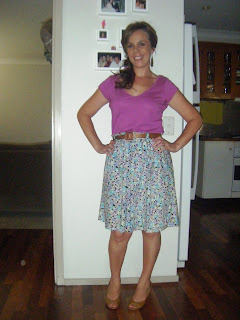
....and all that needed to be done was to undo the crotch seams and re-sew down the front, and down the back tapering in the parts of the old seams so they didn't poke out like a tail. And there was no need for hemming (yay!) as the length was good to go. So, for a couple of minutes on the wizbang sewing machine you get a new girly skirt perfect for spring! 

Its had a few wears already....


Perfectly girly, flowery goodness!

Wednesday, 3 August 2011

Easy Peasy Brimmed Beanie

I found this awesome little project over at Delia Creates while I was searching for some 'boy' projects in a cyber world full of tutorials for girls. This one is GOLD and literally takes 5 minutes - if you have a boy you must give this a go! I started with this (rather bright) red beanie I found at an op shop for a whopping 50c and cut a brim out of an old ice cream container which is perfect for this project as it's flexible but still holds its shape, and best of all can be thrown in the washing machine.


 Said ice cream container brim

Oh, and round off the sharp edges of the brim a little or it may poke through your beanie.

 So in the five minutes between Banana's In Pyjama's and dinner time, we have a brand new winter hat! Ollie insisted on wearing it for dinner and even suggested he could wear it in the bath...um, no. But nice try little guy. 

This honestly takes a zero skill level and would be equally gorgeous for a little girl.

Happy days!