Wednesday, 11 January 2012

Maternity Shorts Refashion

Hellooo refashion! Man I love this stuff, I think its almost addictive.

Any of you ever been left frustrated while shopping for maternity clothes at the sheer lack of variety & "youthfulness" of what's out there? Much of what I've come across would leave a pregnant woman looking like an old maid! Thankfully in summer maxi dresses and stretchy tanks are a saviour, but there are slim pickings in the shorts department for a growing belly. ALL of the maternity shorts I have seen are knee (or just below knee) length, which is no good when you're 5ft nothing as they tend to hang somewhere around mid calf!

So, enter summery yellow thrifted shorts I picked up for 5 bucks. (The colour is washed out in the pics, so much brighter and yummier in real life!)

This was a total experiment but I will definitely be making more of these in the near future.

First step was to remove the waistband and zipper and end up with something like this...


Now, the fly in maternity pants is purely for decorative purposes and doesn't actually function, so once the zipper is removed a straight stitch right over the existing stitching will close it together.

Next its time to attach a fabulously stretchy band to the waist which will act as your new waistband. I raided my scrap stash and used an old white shirt, selecting white so that if I wore these with a white shirt the band colour wouldn't be visible underneath (but you could use any colour really). Using one of my maxi skirts as a guide, I cut a big fat strip of fabric that was tall enough to double over when being worn - you'll see what I mean in a minute - and wide enough to go right round the bump.


And ta da! I am amazed that these actually worked and they fit like a glove. These are one size bigger than I normally wear which is catering for a bit of extra bum & thigh I seem to have acquired this pregnancy. :(

So here's what I mean about the doubling over thing.....


I can wear the band folded down at the moment while the belly is still relatively petite, but as it gets out of control the band can be folded back up for more coverage!

I love these new shorts of mine. So summery and belly friendly all for 5 bucks and about an hour of my time.

Colour blocking anyone? 

Who says maternity wear has to be matronly!?

Thursday, 5 January 2012

Super Duper Tool Belt!

Happy New Year everyone!

Its been a crazy couple of weeks what with the silly season and all, but I've managed to slow down and whip up my first creation of 2012.

Ok so I've mentioned before that our lil guy loves all things that roar - cars, bikes, lawnmowers, power tools - so today we're making a tool belt to help him carry his trusty tools around the house. Poor little fella has been crying out for one of these, resorting to stuffing his tool shaped puzzle pieces in his pants!

Me thinks these tools need a belt!

This is a really simple idea and yet a fabulous item for a bit of boy role play. I cut two squares of fabric - the same width but one slightly longer that the other - and joined them together at the bottom. The front (shorter) piece will provide little pockets for the tools to live. 

Feeling slightly creative today, I decided to add a little embroidery floss in the shape of a hammer to give it some character. 


Next I simply sewed some straight lines down the front to create pockets, and added this little belt to the top.


The belt came with a pair of jeans and had been sitting in his cupboard for well over a year because frankly I find belts on little kids clothes annoying and unnecessary. I am glad I hung on to it though as it came in very handy for giving this tool belt some boyish grunt! 

Previously homeless tools love their new pad!

And the verdict from the man himself? Pretty stoked! Here he is giving it a whirl....

"Is it for me? Oh, thank you so much!"

Thursday, 15 December 2011

Tree Skirt - cos a tree should keep some bits to itself!

Another Christmas post! Well it is only another 9 days (eeek!) so I thought I'd better squeeze it in before I run out of time.

So in previous years our tree has been sitting on three strategically placed place-mats to avoid the legs scratching our wooden floors - not so pretty. So this year I was determined to put those legs into hiding!

I started by cutting out two large circles - one in this super cute owl print and one in a plain calico for the bottom piece. The top will hide the legs while the bottom piece will sit underneath the legs to protect the floor.

Super cute owls!

Then I went about cutting a small hole in the top piece (using a cup as a guide for size), and from this small hole cut a straight line to one edge - in the top circle only. 


Pinning the two pieces together I overlocked the edges including the raw edge created by cutting the line - this opening is going to be where the legs fit in and be hidden away.

Once the overlocking was complete I added some buttons and loops to close up the slit once it was on the tree. These are the least festive buttons you could think of but they were all I had in my stash and I didn't fancy making a special dash to the shops!

Not so festive buttons with ric rac loops

Now the last step - putting it on the tree! This was a bit of a task as our tree was already up and decorated before I made this, so poor hubby had to hold it off the ground while I maneuvered the skirt around the legs. 

Its a little bit bunched up in the pictures because of the whole 'putting it on after the tree was up' debacle but it'll be on first next year and will sit nice and smooth! 


Ta-da! So now these lil fellas will visit each Christmas and I think you'll agree, they are much cuter to look at than these tired old legs....


Merry Christmas everyone!

Saturday, 3 December 2011

Maternity Refashion

Its refashion time friends! I love these projects - partly because the hard work is already done for you in the form of an existing garment and partly because its so satisfying turning something reasonably hideous into a perfectly wearable piece!

So today I started with a thrifted dress I picked up for around $5 at the Salvos with the intention of giving it a little loving.

Now that the belly is starting to grow (its amazing how much earlier you 'pop out' second time around!) I am in need of some roomy clothes to accommodate it. Clothes preferably without the ridiculous pricetag that comes with store-bought maternity clothes.

Ok here's what I started with...

A bit potato-sackey! (ok, a lot)

So, I got to pinching in the dress by attaching a strip of elastic under the bust to give it a little shape and to separate the bust & belly areas. But it was still a bit lack lustre...

Elastic pinching! (with toddler running underfoot 
so mind the weird look here!)

So I raided my scrap pile and cut into an old white shirt to add some neckline detail. I simply cut strips from the shirt and played around with placement before sewing it in place.

And the finished product? I love it! And will actually wear it so we have a winner! 


Yay for refashions! And double yay for inexpensive maternity clothes!

Thursday, 24 November 2011

'Tis the season...DIY Christmas Stocking!

Only 29 sleeps and the big guy will be squeezing down our chimney! Crazy crazy, and I have bought a grand total of one Christmas gift so far...aaargghh!

So although I may seem completely unorganised, I have been giving Christmas some thought and have managed to finish this cute little stocking to stuff full of mini gifts for Master Oliver. This is the first year he is right into Christmas - completely aware of all the decs hanging in the shops and gingerly eying off Santa Claus to decide if he's a trustworthy kind of guy or not!

The inspiration for this stocking came from memories of making a similar one back in school and it was easy peasy. I just cut a square template from a piece of cardboard and used it to cut my pieces required for the stocking. I used an existing stocking to get the shape of the toe bit. 


The back piece is just one whole piece of fabric which simply attached to the front patchwork puzzle. 

It proved popular with the little man, although he seemed to take the phrase 'Christmas Stocking' quite literally....


He's in for a real treat on Christmas morning when he realises its not quite the wearing kind of stocking, but instead a magic kind that fills with goodies on Christmas night!

Friday, 11 November 2011

Goodnight, cars.

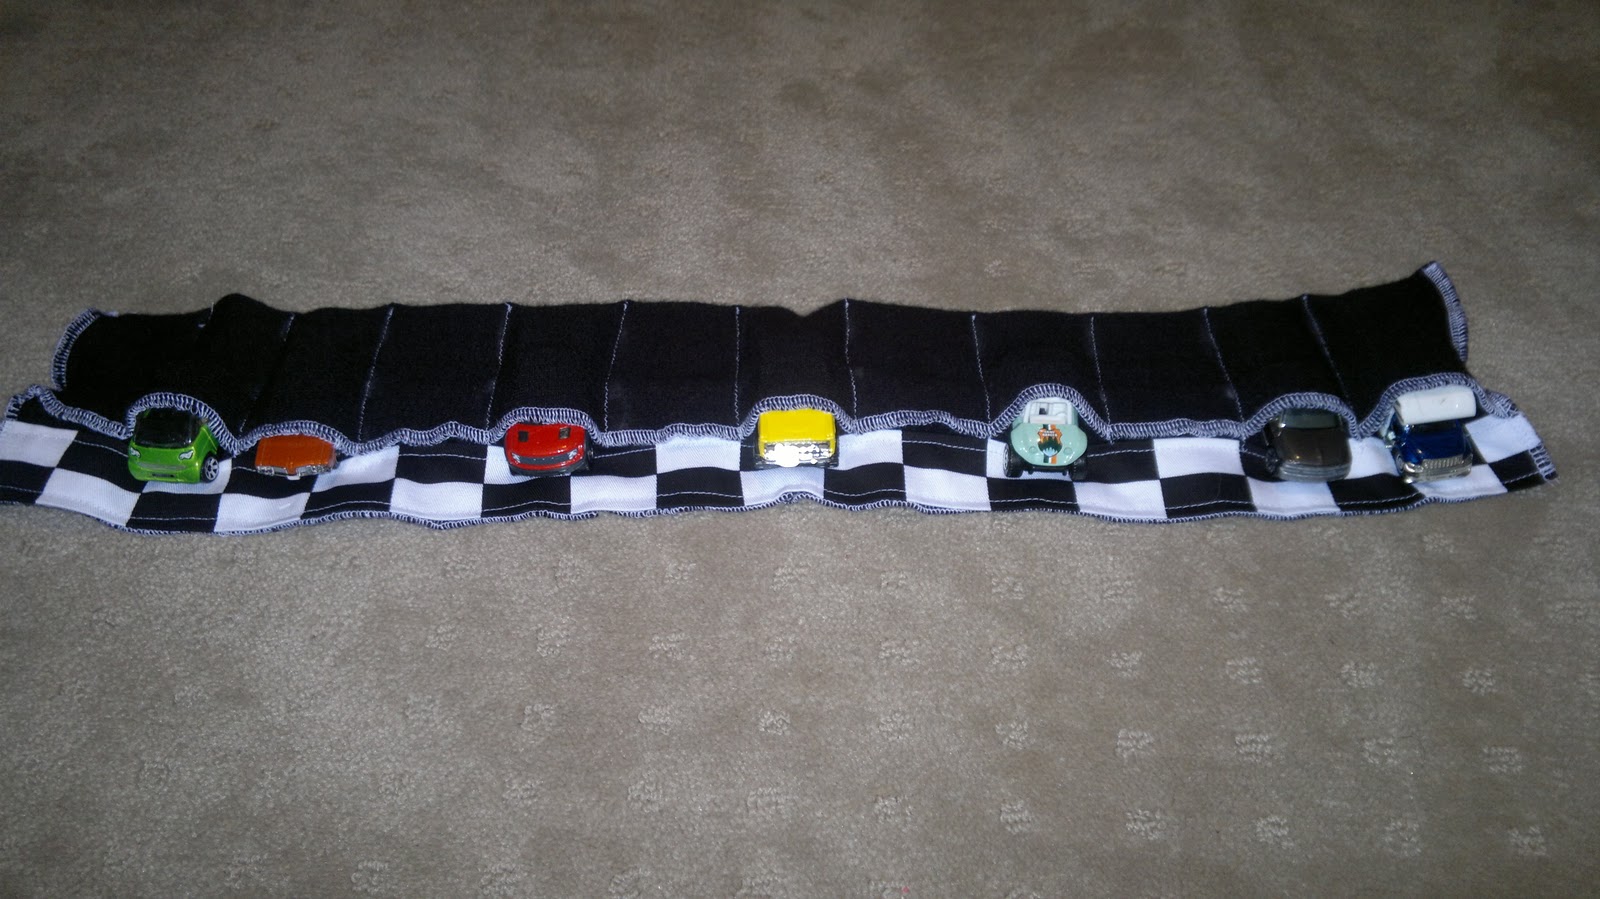
It seems these days we are increasingly finding stray matchbox cars under foot so today they were given a 'garage' in which they can go to sleep after a big day's play! We started with a pair of winter tights that I never wore - too thick and itchy to be comfortable.

Said uncomfortable tights!


This was so simple - I chopped off one leg right up where it meets the crotch, then cut down the length of the leg so it was one open piece.

The over locker went for a spin and finished all the edges, then I folded the leg piece back over so the ends didn't quite meet (you'll see in just sec). 

Add in a piece of checkered material on the bottom to give it that race car feeling, sew some straight lines to act as individual garages and that is it!

See how its not folded quite to the edge?


This is a novel way to get little ones to pack up their cars - our lil guy loves it and the stretch of the tights allows cars of all sizes to be squeezed inside. 


Who knew packing up could be so much fun? 

Now ssshhhh, the cars are sleeping. ;)

Sunday, 6 November 2011

We're going bunting!

Last weekend we took on the task of moving our (no longer a) baby into his big boy room. This was no mean feat given that his 'new' room had become a storage haven over the last few years. So! We got to clearing it out and headed to IKEA to pick up some inspiration and new wares for the boy cave. IKEA! What have I been missing? The place is amazing! We made it out of the 2.2km trek unscathed with hands (or trolleys, rather) full of cool new stuff.

Our lil man is a real boys boy - he loves cars, bikes, lawnmowers, power tools - anything that roars really! So we stuck with a (subtle) car theme and got to work..the IKEA flat paks were assembled by midnight (oh yeah, we were in for the long haul) and the room was completo!


I made these race car themed bunting flags for his last birthday party and still had it stashed away, so out it came to complement the room.


The string of bunting was long enough to reach right around to the other side of the window, I love how it looks in here and love the fact that's its not sitting unused in a craft box!

This is so easy to make! All you need is a triangle template, a mix of fabrics, some bias binding to hold it all together and the ability to sew a simple straight line. And hey, if its not straight no one will ever know!